CMS Help
Advanced Content Management System
Rotating Images
- Tables of Contents
- Prepare a page
- Edit a page
- Calendar
- Image Galleries
- Rotating Images
- Create Isolated/Hidden Sections
- Create Restricted Categories
- Different Content for Authorized Visitor
- Interacting with an external program
- Extending the CMS
- Alias Names for pages
- Quick introduction to the language of the web HTML
Rotating Images
This background is for the site administrator and all page editors.
- The 'dots' that make up an image are called pixels. The rotator tag requires the images to all have the same width and height . An imaging editing program (e.g., The Gimp, Photoshop Elements™) is used to re-size images and also optimize them for display on the web. We will use The Gimp in our examples here because if works on multiple platforms and it is free and open source so it costs nothing to obtain. However, any image editing program with similar capabilities can be used.
- The process of selecting part of an existing image is called "Cropping" and you can look up how to do it in detail by consulting your programs Help file under the word 'Crop'.
- The rotator displays the images in a given media folder in alphabetic order so the names of the files are important. Note: the media folder does not have to be marked as a gallery to use the basic rotator, in fact Galleries to not even have to be enabled on a site to use the basic rotator tag.
- In order for site impaired people to use a web site with images a extra information is needed in the form of text describing the image (and place it in the 'alt' tag). The rotator generates this text by using the folder name followed by the word 'pictures'. For example if the folder is Fiesta/2010 then the system will generate text: "Fiesta: 2010 pictures" for the images alt tag.
- For sites with multiple authors, the 'Admin' user must create the media folder and give the person who will create the rotator permission to add media to that folder. For sites with single authors, just click on the Folders link and create the proper media folder.
- Like the gallery tags, any page author can use the rotator tag if they know the full address of the media folder.
- Copy the images onto your local computer into a separate folder.
- Create a second folder (e.g., work) where the processed images will go.
- Open the image editing program.
- Determine the size you want the final image to be in pixels either the width and the aspect ration (i.e., width to height) or both the width and height.
- Look at all the images you want to include and decide whether the final form looks better with equal size (a square), wider than tall (landscape) or taller than wide (portrait).
- If you already have images of the correct size determine its size in pixels and write it down.
- If its on the web put your mouse cursor over it and view it in a separate window. In Internet Explorer you will have to right click on it and view its properties. In other browsers the width and height will appear at the top of the browser's frame.
- If its on your computer open the graphics program and then open that image. In The Gimp, it size will appear in the right column below the preview when you click on the file (see below for the steps).
- If you don't have an example try various sizes by cropping one them and then view them at 100% (see below for the steps).
- Start The Gimp and begin editing the first file

- Click on the File -> Open command in the main Gimp command bar.
- An Open Image dialog box will open (see here), Navigate to the folder where the original images are displayed and select the first image.
- Click on the Crop ICON
 and the Crop Dialog will open.
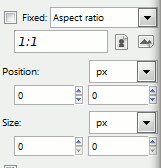
- Select Aspect Ratio and enter the width followed by the height in pixels (e.g., 280 x 197) WHERE 1:1 APPEARS. Also check off the Fixed check box
- Use the cursor to drag through the image in the main window.
- Use the cursor to expand contract or move the window. The ratio should stay the same.
- Hit the Enter key when you are satisfied.
- Click on the Image->Scale Image command and enter the final width. The correct height should be displayed.
- Adjust the View->Zoom to 100% and check the result. If its incorrect use the undo function to try another height and width. Write down the final values
- Click on the File->Save on the command bar. A the save image dialog box will open (its similar to the Open Image dialog box. Navigate to the "work" directory.
- Save the file using the name you have chosen so that the image will appear in the correct order (remember 10Friends.gif will appear before 9ponies.gif since '1' is alphabetically before '9').
- Repeat for each image in the set.
- You will have to reset the aspect ration each time.
- Save the file.
- In the back end select Mange Media button
- Select the correct folder from the list on the right.
- Use the browse button to select each of the files in the work directory, one per line.
- If there are more than 10 files, do the first 10 and then go back and get the next set.
- The tag is |.rotator:Alignment:LLLL:TTT.| where Alignment is either Left or Right, LLLL is the name of the rotator folder (e.g., fiesta/2010) and TTT is the time each image should be up in 1/1000ths of a second (e.g,, to change every 2 seconds enter 2000).
- The tag should appear at the beginning of the line where the top of the image will appear.
- If the image folder is a gallery you can also use the tag |.rotator:Alignment:LLLL:TTT:T.| which will cause the thumbnail images to be used.
Support if by contract only. Use of this software is without any waranttee of any kind.
CyberStrategies releases the content under Creative Commons, Share-Alike (CC-by-SA) License ![]()